The Tick Key: The Ultimate Tool for Fast, Safe Tick Removal
The Tick Key is a small, key-shaped tick removal tool that has earned a permanent spot in many first aid kits, hiking packs, and veterinary clinics. Instead of using fine-tipped tweezers or improvised methods, you place the tool’s notched end against the skin and gently lift the tick away. Its appeal is simple: it is compact, inexpensive, and designed to remove a tick without squeezing its body.
Ticks are not just a seasonal annoyance. They can transmit Lyme disease, Rocky Mountain spotted fever, anaplasmosis, babesiosis, and other illnesses. The longer an infected tick stays attached, the greater the chance of transmission. Prompt, correct removal matters, and that is where a tick key can help. It gives both everyday pet owners and outdoor enthusiasts a reliable, low-tech option when a tick is found.
What Is the Tick Key and How Does It Work?
A tick key is usually made of durable plastic and shaped like a house key or bottle opener. One end has a tapered notch or V-shaped slot. The tool is not a chemical repellent, and it does not kill the tick. It is a mechanical removal device that uses leverage and a snug slot to grip the tick close to the skin.

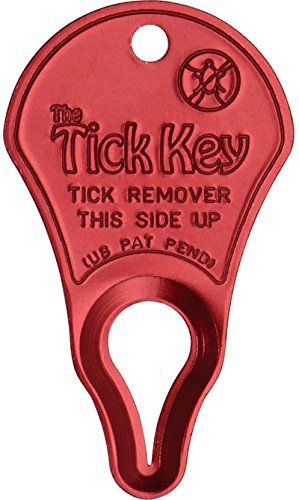

The basic idea is to slide the notch under the tick’s body, right against the skin, then lift the handle upward. The tick becomes trapped in the narrow part of the slot, and the upward motion pulls it out intact. Because the tool grips near the mouthparts rather than the abdomen, it reduces the risk of squeezing the tick and forcing contaminated fluids back into the bite.
Design Features That Make It Effective
Most tick keys are lightweight, smaller than a credit card, and built with a hole for a keychain or lanyard. Some models include multiple notches in different sizes, which helps with tiny nymph ticks as well as larger adult ticks. Smooth, rounded edges are important because they allow the tool to glide along the skin without scratching or pinching.


That compact design makes a tick key easy to carry wherever it might be needed. You can attach one to a dog leash, store one in a glove box, keep one in a backpack, or place one in a home first aid kit. Unlike tweezers, which can be awkward to use on a wiggling pet, a tick key can often be used with one hand while the other hand steadies the animal or the skin.
How the Tick Key Removes Ticks Safely
Safe tick removal depends on getting close to the skin and avoiding sudden jerks. With a tick key, the notched end is placed flat against the skin and then slid forward until the tick is caught in the narrow part of the slot. The user then lifts the handle steadily. The leverage helps separate the tick from the skin without crushing the tick’s midbody.
This matters because a squeezed tick can regurgitate saliva and gut contents into the bite wound, potentially increasing the risk of disease transmission. A tick key also reduces the temptation to twist or yank, two common mistakes that can leave mouthparts embedded. If used carefully, the tick usually comes away whole, and the bite site can be cleaned immediately.


Using the Tick Key on People, Pets, and in the Field
A tick key is versatile enough for human skin, dog fur, cat coats, and even horses or livestock. The main difference is preparation. On a person, you can usually see the tick and clean the area first. On a pet, you may need to part thick fur, stay calm, and use treats or a second person to help keep the animal still.
Before removal, gather what you need: gloves if available, a tick key, rubbing alcohol or antiseptic, and a small container or piece of tape for the tick. If you are in the field, do the best you can with clean hands and a steady approach. The goal is to remove the tick quickly and avoid contaminating the bite area.
Step-by-Step Removal on Humans
Start by inspecting the tick and the surrounding skin. Clean the area with soap and water or an antiseptic wipe. Place the tick key flat against the skin with the notch centered over the tick. Slide the tool forward so the tick is caught in the narrow slot, then lift the handle upward with steady, even pressure. Do not jerk or twist the tool.


After the tick is removed, clean the bite site again and wash your hands. Save the tick in a sealed bag, a small vial, or a piece of tape if you want it identified later, and write down the date. Monitor the area for an expanding rash, fever, headache, muscle aches, or other symptoms. If you develop concerning symptoms, contact a healthcare provider promptly.
Removing Ticks from Dogs, Cats, and Horses
For pets, check common attachment sites first: ears, neck, under the collar, armpits, groin, paws, and around the tail. Part the fur gently and place the tick key against the skin, not against the hair. Use slow, steady leverage. If the pet flinches, pause, reassure them, and try again rather than yanking the tool away.
After removal, disinfect the bite area and clean the tick key. Dispose of the tick by placing it in alcohol, flushing it, or sealing it with tape. Check pets daily after walks in tall grass, woods, or brush, especially during spring, summer, and fall. Tick preventatives can reduce risk, but they do not replace a thorough body check.
Why the Tick Key Is a Smart Addition to Any First Aid Kit
A tick key is affordable, reusable, and does not rely on batteries, chemicals, or complicated instructions. That makes it a practical addition to a first aid kit for families, campers, hunters, hikers, gardeners, and pet owners. It can sit unused for months and still be ready when a tick appears.
It is not a substitute for medical or veterinary advice, and it does not test for disease. However, it can make the first critical step—complete and careful removal—much easier. When paired with knowledge of tick habitats and symptoms, a tick key becomes part of a broader prevention strategy rather than a standalone cure.
Tick Key vs. Tweezers and Folk Remedies
Fine-tipped tweezers are often recommended for tick removal, and they can work well when used correctly. The challenge is that many people grab the tick too close to the abdomen or squeeze while pulling. A tick key minimizes that error by using a slot that surrounds the tick and leverages it away from the skin. For pet owners and people who are squeamish about tweezers, the key-shaped tool can feel more controlled.
Folk remedies such as petroleum jelly, nail polish, alcohol, or a lit match should be avoided. These methods can irritate the tick and cause it to regurgitate, which may increase the chance of infection. They also delay proper removal. A tick key, by contrast, removes the tick directly and quickly, which is exactly what public health guidelines recommend.
Cleaning, Storage, and When to Replace It
After each use, wash the tick key with warm soapy water and rinse it well. Disinfect it with rubbing alcohol or a disinfecting wipe, then let it dry completely. Check the notches and edges for cracks, bends, or rough spots. A damaged tool may not grip the tick properly and could injure the skin.
Store the tick key where you will remember it: a first aid kit, glove compartment, backpack, purse, or pet supply bag. Replace it if it becomes brittle, cracked, or warped from heat. Keeping a small tick removal card or guide nearby can also help you follow the correct steps under stress.
Before your next hike, camping trip, or evening walk with the dog, take a moment to add a tick key to your gear. It takes up almost no space, costs very little, and can turn a stressful tick encounter into a quick, confident removal. The best time to prepare is before the tick is already attached.
Related Articles

Decal Remover Tool: The Ultimate Solution for Fast, Scratch-Free Decal Removal
Removing an old decal can feel like a small project that turns into a frustrating battle of sticky residue and torn vinyl. A decal remover tool gives you...

Cylinder Sleeve Removal Tool: Fast, Safe & Damage-Free Engine Rebuilds
Removing a worn or damaged cylinder sleeve is one of those engine-rebuilding jobs where the right cylinder sleeve removal tool saves hours of frustration and...

Hub Bearing Removal Tool: The Ultimate Guide to Fast, Easy Removal
Replacing a wheel hub bearing is one of those jobs that looks straightforward on paper until you are staring at a rusted assembly that refuses to budge. A hub...

Fire Poker Stick: The Ultimate Fireplace & Campfire Tool for Safe Log Turning
A fire poker stick is one of those deceptively simple tools that quietly holds a campfire or hearth together. It is the long, rigid rod you use to nudge a...

Premium Z Coins: The Ultimate Guide to Safe, Fast & Affordable Buys
Premium Z coins — often typed as premium z coins — occupy an unusual corner of the digital economy. They can appear as high-tier rewards in a gaming...

Using a Stump Grinder: The Ultimate Guide to Safe and Efficient Stump Removal
Using a stump grinder is the most efficient way to eliminate an unsightly tree stump without digging it out by hand or hauling away heavy root balls. These...